[vc_row][vc_column][vc_column_text]
Outdoor Living Space Design with Concrete Texture & Color Step by Step
[/vc_column_text][/vc_column][/vc_row][vc_row css=”.vc_custom_1475795469207{margin-top: -30px !important;}”][vc_column][vc_column_text]

[/vc_column_text][vc_column_text]With some many great products made by manufacturers in the Decorative Concrete Industry, we wanted to focus on new application techniques using products that are well known and readily available. So at this year’s Concrete Décor Show in very warm and sunny San Diego, California we choose to display the latest social media industry trends. We decided on two types of floor techniques and two wall applications. We appreciate everyone stopping by and seeing us and as promised here is your recipe card for each technique including materials used and color dilution rates.[/vc_column_text][vc_separator color=”black” border_width=”10″][/vc_column][/vc_row][vc_row][vc_column][vc_column_text]
Step One: Creating the Concrete Wall with Faux Brick Appearance:
[/vc_column_text][/vc_column][/vc_row][vc_row][vc_column][vc_separator color=”black” border_width=”10″][vc_single_image image=”17293″ img_size=”full” alignment=”center” style=”vc_box_shadow_3d” onclick=”zoom”][vc_column_text]
SureCrete Products Used: WallSpray, Micro Topping (White), Color packs, XS Veining, Eco-Stain, XS-327
[divider style=”line” color=”green” size=”3″] [/divider]
[/vc_column_text][/vc_column][/vc_row][vc_row][vc_column width=”1/12″][vc_column_text][/vc_column_text][/vc_column][vc_column width=”10/12″][vc_column_text]
Concrete Wall with Faux Brick Shapes Installation and Application Process:
- WallSpray bag mix was used to create the base of the wall along with the brick. To create the base color (1) Desert Sand Color Pack was added to each bag of WallSpray.
- The scratch coat was applied by a gravity-feed hopper gun and troweled tight and smooth.
- Next, WallSpray has hand applied to a thickness of about ½ inch. Once applied in desired areas, it was hand carved into the faux brick shape.
- To overcome the seams between the walls, a thin overlay was troweled into it (we used Winter SureSpray, but any thin overlay could work).
- Once the seams were dried, Micro Topping with (1) Sun Buff color pack was troweled onto the WallSpray scratch coat and burnished.
- Once the Micro-Topping was completely dry, Espresso Eco-Stain was made at a 4-1 dilution rate (4-parts water and 1-part eco-stain) and lightly sponged onto the walls to create additional movement.
- The faux bricks were colored using the XS Veining material. Colors used were: Smoke, Sun Buff, Dark Walnut, Desert Sand.
- Each color of the XS Veining had water added to it in a small mixing container. The goal was to create a loose paste that could be brushed and sponged on to color and age the bricks.
- Once all surfaces were completely dry, XS-327 was used to seal the surface. XS-327 was mixing properly and then diluted to a 4-1 mixture (4-parts water to 1-part catalyzed XS-327).
- This mixture was sprayed onto the wall using a Chapin Sprayer and a rag to touch up any drips. A second coat was applied shortly after (typical times range from 20 minutes to 2 hours).
[/vc_column_text][/vc_column][vc_column width=”1/12″][/vc_column][/vc_row][vc_row css=”.vc_custom_1475879035410{margin-top: -20px !important;background-position: center !important;background-repeat: no-repeat !important;background-size: cover !important;border-radius: 5px !important;}”][vc_column][vc_row_inner][vc_column_inner width=”1/3″][vc_column_text] [/vc_column_text][/vc_column_inner][vc_column_inner width=”2/3″][vc_column_text]
 [/vc_column_text][/vc_column_inner][/vc_row_inner][vc_row_inner][vc_column_inner width=”1/2″][vc_column_text]
 [/vc_column_text][/vc_column_inner][vc_column_inner width=”1/2″][vc_column_text]
 [/vc_column_text][/vc_column_inner][/vc_row_inner][vc_row_inner][vc_column_inner width=”1/3″][vc_column_text]
 [/vc_column_text][/vc_column_inner][vc_column_inner width=”2/3″][vc_column_text]
 [/vc_column_text][/vc_column_inner][/vc_row_inner][vc_column_text]
 [/vc_column_text][/vc_column][/vc_row][vc_row css=”.vc_custom_1475795469207{margin-top: -30px !important;}”][vc_column][vc_separator color=”black” border_width=”10″][/vc_column][/vc_row][vc_row][vc_column][vc_column_text]
Step Two: Creating the Flagstone Floor with Concrete Overlay:
[/vc_column_text][/vc_column][/vc_row][vc_row][vc_column][vc_separator color=”black” border_width=”10″][vc_single_image image=”17304″ img_size=”full” alignment=”center” style=”vc_box_shadow_3d” onclick=”zoom”][vc_column_text]
SureCrete Products Used: SureSpray , TruColor™ Color packs, fiber reinforced tape, SCR™, Eco-Stain™, and XS-327™
[divider style=”line” color=”black” size=”3″] [/divider]
[/vc_column_text][/vc_column][/vc_row][vc_row][vc_column width=”1/12″][vc_column_text][/vc_column_text][/vc_column][vc_column width=”10/12″][vc_column_text]
Concrete Flagstone Overlay Installation and Application Process:
- The concrete floor was prepared by cleaning it with SCR at a 2-1 dilution rate (2-parts water to 1-part SCR). The floor was scrubbed with a brush broom and then rinsed clean.
- Once the concrete surface was dry, SureSpray with (1) color pack of Desert Sand then was squeegeed onto the floor. This process smooths out any variations in the concrete and will act as your grout line.
- Using a ½” fiber tape, the pattern and borders were placed onto the dried scratch coated concrete surface. Three strips were then placed done per line needed. Once all tape had been placed, it was cut with a razor with an irregular shape. This will create a random stone edge, once the cut fiber taped is removed.
- SureSpray was made again with (1) color pack of Sand Buff. The thin concrete overlay was troweled onto the surface, trying to create a 1/8th inch of material.
- Once material could be touched and not have material pull away on your skin, it was sprayed with the liquid release and stamped with a skin mat (old granite cleft stone).
- The fiber taped was pulled shortly after, to help create a more realistic stone effect from the chattering that occurred.
- Once material thoroughly dried, it was cleaned with SCR at a 4-1 dilution rate, to remove the liquid release residue.
- Espresso Eco-Stain at a 10-1 dilution rate (10-parts water to 1-part eco-stain) was sponged onto the texture, careful to avoid getting it onto the light colored grout lines.
- Once the Eco-Stain had dried, it was sealed with XS-327. XS-327 was mixed properly and then diluted to a 4-1 mixture (4-parts water to 1-part catalyzed XS-327).
- This mixture was sprayed onto the wall using a Chapin Sprayer and a rag to touch up any drips. A second coat was applied shortly after (typical times range from 20 minutes to 2 hours).
[/vc_column_text][/vc_column][vc_column width=”1/12″][/vc_column][/vc_row][vc_row css=”.vc_custom_1475879035410{margin-top: -20px !important;background-position: center !important;background-repeat: no-repeat !important;background-size: cover !important;border-radius: 5px !important;}”][vc_column][vc_row_inner][vc_column_inner width=”1/3″][vc_column_text] [/vc_column_text][/vc_column_inner][vc_column_inner width=”2/3″][vc_column_text]
 [/vc_column_text][/vc_column_inner][/vc_row_inner][vc_row_inner][vc_column_inner width=”1/2″][vc_column_text]
 [/vc_column_text][/vc_column_inner][vc_column_inner width=”1/2″][vc_column_text]
 [/vc_column_text][/vc_column_inner][/vc_row_inner][vc_row_inner][vc_column_inner width=”1/3″][vc_column_text]
 [/vc_column_text][/vc_column_inner][vc_column_inner width=”2/3″][vc_column_text]
 [/vc_column_text][/vc_column_inner][/vc_row_inner][vc_column_text]
 [/vc_column_text][/vc_column][/vc_row][vc_row][vc_column][vc_column_text]
How to Make Wood Looking Concrete Floors Step by Step
[/vc_column_text][/vc_column][/vc_row][vc_row][vc_column][vc_separator color=”black” border_width=”10″][vc_column_text]
Step Three: Creating a Wood Looking Concrete Thin Overlay:
[/vc_column_text][vc_separator color=”black” border_width=”10″][/vc_column][/vc_row][vc_row][vc_column][vc_single_image image=”25389″ img_size=”full” alignment=”center” style=”vc_box_shadow_3d” onclick=”zoom”][vc_column_text]
SureCrete Products Used: SureSpray (winter), Color packs, Liquid Release, Eco-Stain, and XS-327
How to Make Wood Looking Concrete
[/vc_column_text][/vc_column][/vc_row][vc_row][vc_column width=”1/2″][vc_column_text]
Concrete Overlay Wood Looking Floor Installation and Application:
- The concrete floor was prepared by cleaning it with SCR at a 2-1 dilution rate (2-parts water to 1-part SCR). The floor was scrubbed with a bush broom and then rinsed clean.
- Once the concrete surface was dry, SureSpray with (1) color pack of Desert Sand was squeegeed onto the floor. This process smooths out any variations in the concrete and will act as your grout line.
- Once material fully dried, lines were drawn out in pencil, for ideal stop points, if needed during this process.
- SureSpray was mixed up with (1) color pack of Desert Sand and troweled in between the desired lines. Once troweled out smooth, the texturing process began.
- Textured was created by using a thin bristled broom, stiff bristle nylon hand brush, and chip brushes.
a. Using the thin bristle broom texture was created in the desired vertical direction of the wood plank.
b. Next, we used the stiff nylon handheld brush to create a heavier textured look.
c. The chip brush was used to create the knots, by twirling it in a circular motion. And we also used it to flatten texture grain that was taller than desired. - Lastly, we normally would use a level, but we used what was available which was a melamine board. We sprayed it with Liquid Release, placed it to the desired plank width, and used a margin trowel to cut the material to simulate wood planks.
- The material was allowed to dry completely and was then rinsed with an SCR at a 4-1 dilution rate (4-parts water to 1-part SCR).
- When the surface was completely dry, we began the processing of stain the wood planks with two different colors of Eco-Stain with various dilution rates. The process was:
a. Flood the surface with a pump-up Chapin sprayer filled with Espresso Eco-Stain at a 4-1 dilution rate.
b. We spot applied Espresso Eco-Stain at a 2-1 dilution rate with a chip brush on only specific planks.
c. We used Domino Eco-Stain at a 2-1 dilution rate on the same planks we used the Espresso 2-1 to add increased depth of color.
d. We tied in all wood planks with a spray application of the Espresso Eco-Stain at a 4-1 dilution rate. - Once the Eco-Stain had dried, it was clear sealed with XS-327. XS-327 was mixed properly and then diluted to a 4-1 mixture (4-parts water to 1-part catalyzed XS-327).
- This mixture was sprayed onto the floor using a Chapin Sprayer and a roller to even out an puddling. A second coat was applied shortly after (typical times range from 20 minutes to 2 hours).
[/vc_column_text][/vc_column][vc_column width=”1/2″][vc_column_text]
[Form id=”96″]
[/vc_column_text][/vc_column][/vc_row][vc_row css=”.vc_custom_1475879035410{margin-top: -20px !important;background-position: center !important;background-repeat: no-repeat !important;background-size: cover !important;border-radius: 5px !important;}”][vc_column][vc_row_inner][vc_column_inner width=”1/3″][vc_column_text]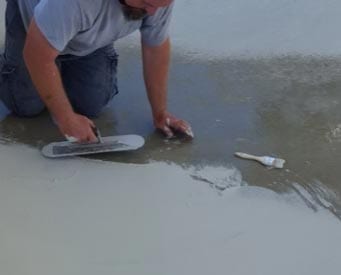 [/vc_column_text][/vc_column_inner][vc_column_inner width=”2/3″][vc_column_text]
 [/vc_column_text][/vc_column_inner][/vc_row_inner][vc_row_inner][vc_column_inner width=”1/2″][vc_column_text]
 [/vc_column_text][/vc_column_inner][vc_column_inner width=”1/2″][vc_column_text]
 [/vc_column_text][/vc_column_inner][/vc_row_inner][vc_row_inner][vc_column_inner width=”1/3″][vc_column_text]
 [/vc_column_text][/vc_column_inner][vc_column_inner width=”2/3″][vc_column_text]
 [/vc_column_text][/vc_column_inner][/vc_row_inner][vc_row_inner][vc_column_inner][vc_column_text]
 [/vc_column_text][/vc_column_inner][/vc_row_inner][vc_row_inner][vc_column_inner width=”1/3″][vc_column_text]
 [/vc_column_text][/vc_column_inner][vc_column_inner width=”1/3″][vc_column_text]
 [/vc_column_text][/vc_column_inner][vc_column_inner width=”1/3″][vc_column_text]
 [/vc_column_text][/vc_column_inner][/vc_row_inner][vc_column_text]
 [/vc_column_text][/vc_column][/vc_row][vc_row][vc_column][vc_column_text]
 [/vc_column_text][vc_column_text][/vc_column_text][vc_video link=”https://www.youtube.com/embed/I31EVijiTxg” align=”center” title=”How to Make Wood Looking Floors Video:”][/vc_column][/vc_row][vc_row][vc_column][vc_column_text]
More Wood Looking Concrete Ideas:
[/vc_column_text][vc_masonry_media_grid style=”lazy” items_per_page=”6″ grid_id=”vc_gid:1524100623351-d97b628c-2672-4″ include=”25009,16189,15891,15898,15568,15567,15562,15560,15538,15556,15535,15435,15418,15407,15392,15391,15390,15396,15402,10579,10309,6733,6287,11824,12299,12535,15052,15405,15576,15843″][/vc_column][/vc_row]